If you love a tasty quail meal and want an endless supply of quail meat, you may consider keeping quail at home. In this post, I will help you get started raising quail for meat. Since quail are among the fastest-growing animals, and they are ready to be butchered at 8 weeks (or even at 6 weeks if with a simple trick I’m going to share with you later), they are the perfect type of meat to grow.
Here are the steps involved in raising your quail for meat:
- Calculate the number of birds you need
- Calculate the space you need for your birds
- Purchase the necessary equipment
- Purchase your quail
- Dial in and follow a daily/weekly/monthly routine
- Understand quail behavior
There is a fair amount of overlapping between keeping quail for eggs and keeping them for meat, and keeping them for meat requires more planning, more space, and more equipment too. If you only want to keep quail for eggs, read my ultimate guide to keeping quail for eggs.
I will focus on the most straightforward way you can get started as a beginner and the way I recommend to all my friends who want to join this journey.
Learn how to raise your own quail and have an unlimited supply of eggs and meat.
Calculate flock size
To have a quail to raise, butcher, and process, you need to have a breeding cage with hens and roosters to provide you with fertile eggs.
The following steps are going to help you do the calculation.
- Step one: figure out how many quail you are going to consume.
- Step two: calculate the size of your breeding flock.
Step one
To calculate how many quail you need to feed your family, consider how much meat your family needs per meal and per month.

The reason why it’s convenient to calculate in monthly cycles is because it takes a little under three weeks for quail eggs to hatch, and it allows you to have a week off between two periods of incubation.
You should calculate with two quail per adult per meal, and one quail per child per meal.
To figure out how many birds your family needs in a month, multiply the number with the number of times you’d like to have quail on your plate per week, and then multiply the number again by four (four weeks per month).
Assuming that 70% hatch rate on your incubated eggs and a 10% mortality rate among your newly hatched quail chicks, you need to multiply your monthly quail need by 1.6. This is the number of fertile eggs you need to place in the incubator every four weeks.
Step two
Next, figure out how many quail do you need in your breeding cage so you can have sufficient eggs ready for incubation.
A quail hen will lay an egg almost every day, and eggs retain their fertility for 10 days, after which it declines rapidly. Divide the number of eggs you have to put in the incubator by 10 to get how many hens you need in your breeding flock.
Divide the number of hens by 4 to get how many roosters you need.
Examples
Let’s illustrate everything with a few concrete examples in a neat table.
| Family size | 4 (two adults, two children) | 5 (two adults, three teenagers) | 6 (two adults, four children) |
| Quail per meal | 6 | 10 | 10 |
| Quail meals per week | 2 | 3 | 1 |
| Quail meals per month | 8 | 12 | 4 |
| Fertile eggs needed | 77 | 192 | 64 |
| Hens in the breeding cage | 8 | 20 | 7 |
| Roosters | 2 | 5 | 2 |
I also prepared a calculator in a Google Sheet, which you can access by clicking here. You need to save it to your own Google Drive.
In this video, I explain how the calculator works.
Calculate space
Quail, unlike chickens, don’t require a lot of space. Some people choose to keep them in aviaries, but they can also be kept in cages.
If you use a cage, you can keep 3 birds per square foot in the breeding cage. If they have more space, it’s going to be a challenge to introduce new birds to the flock.
When it comes to selecting the cage, you can build the cage yourself (which is what I did), or you can purchase pre-made cages.
There is a huge variety available, but I like the Hatching Time cages, and I think they make the perfect cage for any new quail keeper. They are modular, which means that they can be tailor-made to your size requirements; they are made of plastic and thus are rust-free, and they incorporate the cage and the feeding and watering system. You can purchase them on their website directly or on Amazon here.
A flock of 10 birds can be kept in a small, 3-4 square foot cage. I recommend planning to have a larger cage than you initially thought, as you may want to increase the size of your flock after a while.
I built a cage for my own birds, and I made it larger than needed intentionally. It is 200 cm wide, 70 cm deep (78.5″ x 25.5″), and it has three floors, which gives me a total of 4.2 square meters (45 sq feet) of floor space. I only keep 60 birds across all three levels, but the numbers always change as I hatch new ones and cull some.
- The top level is a dedicated breeding cage. I keep only 10 birds here (2 roosters and 8 hens).
- The middle level is a dedicated layer cage with 1.4 sq meters of space (15 sq feet). Currently I keep only 16 birds here, but it could host up to 60 birds if I wanted to.
- The bottom level is a grow-out cage where I place quail that need to move up from the brooder after hatching.

Initial investment
The fastest way you can start having your own quail eggs for incubation is by purchasing mature quail hens and roosters.
I recommend getting started with a feather-sexable color like the Pharaoh or the Italian. This will help you monitor the activity in your cage.
This is a complete list of things you need to get started raising quail for meat:
- Quail
- Incubator
- Cage
- Feeder and waterer
- Food
- Brooder and heater
- Compost for waste management
Cage
Unless you already have the raw material to build one, the cage is your biggest expense by far. Expect to pay anywhere between 100 and 500 dollars on a good, safe cage.
When I built the cage for my birds, the raw material (lumber, hardware cloth, screws etc) cost me around 250 dollars, which was a surprise to me because I expected to pay much less. Still, if I had bought the same size outdoor cage, I would have paid well over 1000 dollars.
I wrote an entire article about quail housing and how to choose the perfect habitat for your quail here on This Happy Farm, which you can read here.
Incubator
Quail are not good at hatching their own eggs. It can happen, but it’s not very common, and you can certainly not rely on them going broody and hatch their own eggs to supply you with meat.
To hatch and raise your own quail for meat you need a reliable incubator. Along with the cages, the incubator is the second biggest expense. It can range from 60 dollars up to 500-600 dollars, and even more.
The main difference between the cheap and the expensive models is the size and the functions offered. Don’t try to save money on the incubator because this will last you for years.
I’d much rather spend some extra money here, and save on the cage by fabricating the cages myself.
Pay attention to the following when selecting an incubator:
- Capacity (make sure it can take all the eggs you need to incubate)
- Circulated air function (it has the best distribution of temperature)
- Automatic egg turners (this saves you from having to turn the eggs manually several times a day)
Feeder and waterer
A good feeder and waterer are essential. You need to ensure that your quail have access to water and food at all times.
In my experience, hungry and thirsty quail quickly turn against each other, and they can be very vicious toward each other. When food or water arrives after not having access to any, they all want immediate access, which can lead to some injuries too.
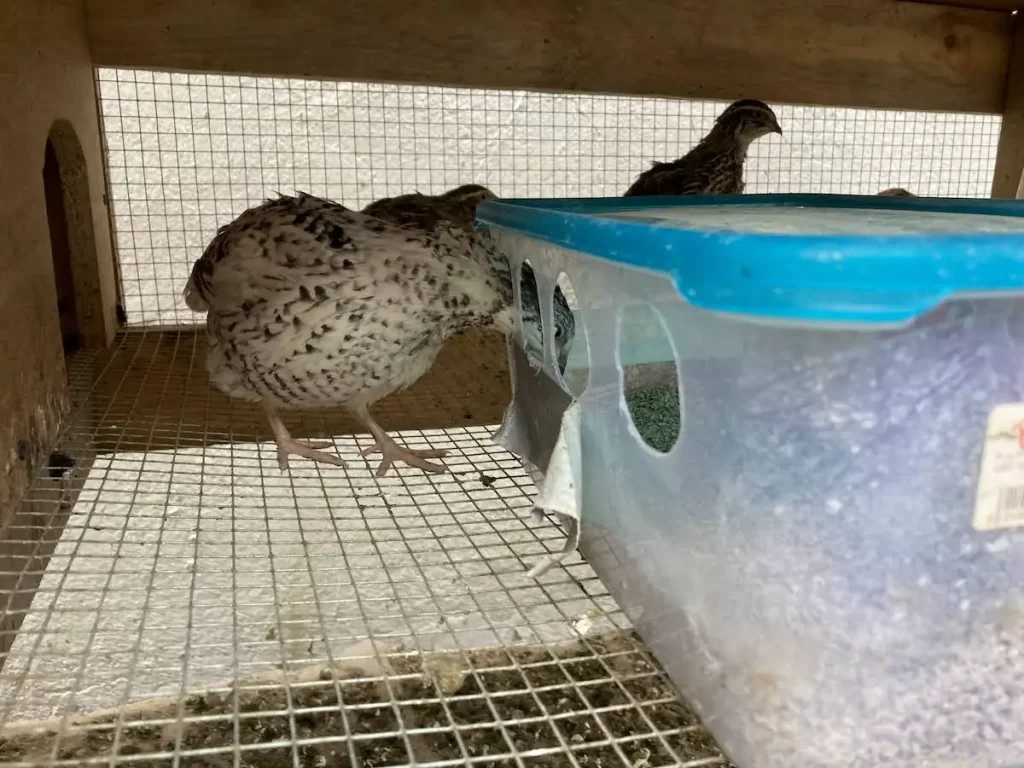
My feeder of choice is a simple plastic Tupperware box with holes on its side. I’d love to say that it completely eliminates food waste, but that’s not the case 100% of the time. Quail are messy eaters, and I’m still looking for the perfect solution.
For watering, I use a cup-style reservoir as well as a mason jar. I much prefer the cup-style watering system because it is much cleaner. The mason jar always ends up very messy and needs to be cleaned every time I refill it. It collects manure and grit from the quail.
Since the water container is located outside the cage, it’s also easier to refill than the jars that need to be removed.


Food
Feeding your quail is an ongoing expense you need to calculate. You only need a layer feed for the quail in your breeding cage, but you need to feed a starter feed to your baby quail that hatch in the incubator.
Quail food is slightly different from chicken feed as it contains different amounts of proteins, calcium, and other nutrients. If quail-specific feed is not available, you can use generic game bird feed, pheasant feed, or turkey feed as well.
To plan how much food you can expect to give your quail, I wrote a detailed article that explains everything you need to know about feeding quail here.
Brooder and heater
Once you start hatching your own eggs, you need to manage the newly hatched quail chicks. Since they can’t go straight into the cage, you need to invest in a brooder, where they’re going to spend the first few weeks of their lives.
The brooder can accommodate more quail per square foot than the cage. Calculate with 6-7 chicks per square foot. By the time they grow 3-4 weeks old and the brooder gets too small for them, they will be ready to move to the grow-out cage, and soon to be processed.
You will also need a heat lamp or a heat plate to keep the baby quail warm in the first few weeks. I have an article dedicated to how to take of your baby quail in the first 10 days.
Waste management
Not only do quail eat and lay eggs, they also produce quite a lot of waste. Their manure can’t be added directly to fertilize plants, but it is a great material to add to you compost. It takes approximately 6 months for quail manure to break down and be used as an excellent fertilizer.
If you have a small compost box and only a few birds, this may never become an issue, but if you keep many birds, and you don’t have a place to put their droppings yet, you need to consider this aspect as well.
A compost box like this one on Amazon can help you manage quail waste efficiently.
Getting your quail
Once you have everything set up and ready to go, you need to purchase some quail.
As a beginner, you rely on the expertise and knowledge of the seller, so make sure that you buy from someone you can trust. If you know a friend that keeps quail, you can get it from them, or you can also go to a quail farm that happily assists you and sell you the perfect quail you need.
My Shire Farm farm is a go-to place for many, and I recommend them if they ship to your area. Zach offers a lot of great information about quail on his YouTube channel and it’s a real family business that cares about you and your success.
Here are the things to keep in mind when you buy quail:
Buy them 6-8 weeks old. They may have started laying at this point, or they may be about to start laying. They will ramp up their egg production by week 12. This gives you enough time to get to know them, and for them to feel comfortable at their new home.
Jumbos vs regular. Jumbo quail lay slightly larger eggs (12-14g instead of 10-11), but they lay fewer in a year than regular quail (approximately 10% less). I prefer jumbo quail because their eggs are easier to handle. Choose jumbos for meat because they grow faster and they are larger in size when fully grown (10+ oz instead of 8-10oz of regular quail).
Routines
Quail don’t need a lot of TLC. As long as you keep their cage clean and they are fed and watered, they live a happy life and provide you with eggs. I can spend less than an hour a week caring for my quail and keep them happy.
Here are my routines:
Daily:
- Top up water and food (morning and evening). Less than 5 minutes
- Collect eggs in the evening
- A quick check to make sure everyone is alive
Weekly or every few days:
- Clean cage and remove manure (This depends on how your pen is set up. Outdoor wire-bottom cages are very practical)
- Observe your quail for a few minutes for irregular behavior
- Check each quail briefly (without removing them) to see if there are minor injuries to keep an eye on.
Every few months:
- Top-up sandbox (if they have one)
- Deep clean the cage
- Maintain any worn/broken part of the cage
Quail behavior 101
After you purchase your first batch of quail, you’re going to enjoy watching them. At first, they all seem very similar, but as you get to know them, you’re going to see that there is a pattern of behavior in the covey as well as in some individual birds.
Let’s see how your quail behave throughout the day so you understand what you can expect. In my observation, the pattern of the day can be divided in five parts: morning, early afternoon, afternoon, evening and night.
Morning
Quail usually wake up when it gets bright and immediately start looking for food. You can hear that they are active in this period. Hens are not noisy at all, but if you have a wire-bottom cage, you can hear their claws clicking, and they are excited about getting some food.
If you have roosters among your quail, this is when you hear them crow a lot, and you can observe breeding activity in the cage.
Make sure that they have access to food as soon as they wake up. I top up their food and water the night before.
Early afternoon
The quail are having their down-time, they digest the food from the morning and the hens are preparing to lay eggs later on. They are not very active in this period.
Afternoon
Your quail hens start laying eggs at round 3 pm and continue to lay until 7-8 pm. You can often hear “egg songs”, which tells you that a hen has just laid an egg.
Evening
Quail are usually active in the evening. They replenish their body and they prepare for the night. This is a similar period to the morning.
If you have roosters, you can hear them crow as the light is fading away.
Night
Quail go to rest and to sleep once it gets dark. This is a very calm and quiet period for them. If you hear any noise at night, it may be due to a predator or some other source of stress.
Stress
Stress is one of the factors that most affect egg production. Stressed birds don’t lay as many eggs or they may stop laying altogether.
Quail react to different types and intensities of stress in different ways.
Some quail get stressed when you hold them in your hand, while others don’t mind it.
The worst kind of stress is what comes from a predator. Racoons, rats and foxes, among others, all prey on quail. They are at the bottom of the food chain. If you hear them stress at night or if you see some of them missing limbs or bleeding in the morning, it’s a sure sign that you have some unwanted visitors.
Aggression
As cute as quail are when they hatch or even when you see them for the first time, they can be very aggressive toward each other.
The most aggressive attacks I’ve ever experienced was when I introduced a new rooster to an already existing flock. Removing all of them from the cage and letting them make friends with each other in a neutral territory, and then introducing them in the final cage, is one powerful way you can minimize the chances of quail aggression.
Observe the cage, and try to understand if you have behavior issues.
Some quail are dominant and they show aggression towards others. Keep an eye on such birds because they can cause physical harm to the others and they can also stress them out, which leads to decreased egg production.
The most aggressive quail is is not always the largest bird. In fact, in my covey, one of the smallest emerged as an aggressor, and had to be removed from the cage because it was such a bully.
Some quail withdraw and you’re going to find them always in the same corner of the cage. It is worth checking on these regularly, and inspect if you see any physical injuries on them as they often retreat from an aggressive cage-mate.
When can you butcher your quail?
Quail grow remarkably fast, and they reach their final adult size at 10 weeks of age, and they are 90-95% their final size at 8 weeks of age.
You can reduce the time it takes to raise them to 6-7 weeks if you keep them on the starter feed. Since you hatch these quail to process them, you don’t need to change them to a layer feed, which contains less protein and more calcium. The protein-rich starter feed keeps them growing faster.
The jumbo quail I keep on the starter feed are usually ready to be butchered at 6 weeks.
Happy quailing!
