When and how often you should candle duck eggs?
Duck egg candling is timed at crucial points of embryonic development to assess the viability and to remove the dead ones by looking inside the eggshell. It is performed with a dim light source on days 7 and 14 to fine-tune processes, minimize embryonic deaths, and increase the fertility rate.
Candling eggs provide you with benefits, but the keys to its success lie in timing, handling temperature, and correct development assessment.
Here’s all the information you need to know about duck egg candling and how you can use them to increase your egg production and duck hatching success rate.
Learn how to raise your own quail and have an unlimited supply of eggs and meat.
Why Do You Need to Candle the Eggs?
First off, egg candling allows you to peek inside the development stages of the duck embryo inside the closed shell. It does not involve sophisticated equipment, but it would need your good judgment of what to do with what you see.
The results of your observations during egg candling will lead you to make good decisions, improve your methods, and increase your poultry operation success.
Sets the right expectations for the number of hatchings
Candling duck eggs allows you to see if an egg develops normally or not. As with the latter, you can spot abnormalities early on so you can separate them from the good ones.

Allows you to separate the bad from the good ones right away.
It keeps the bad eggs from being rotten
In the same way, by leaving bad eggs rot in the egg incubator, you risk them exploding and producing a stinky mess. Gas builds up in rotten eggs and the humidity inside the incubator can cause them to explode.
Not only does it produce a mess, but also exposes the good ones to bacteria, which may also cause them to rot, too, or the hatched ducklings to infection or disease.
By removing bad eggs from the incubator you reduce the risk of infections and also the mess a bad egg can cause.
Helps you in improving your incubation method
Egg candling happens within the incubation period. Essentially, it allows you to observe an embryo’s growth and development and determine if an egg is fertile or not.
For duck eggs, the usual incubation period is between Days 1 to 28. On the other hand, chicken eggs have it shorter at only up to Day 21. At this stage, critical elements you should ensure are temperature, humidity, and turning frequency, which we will discuss later.
Now, through egg candling, you can gather data about the development of the embryos inside the shell. You can also experiment with different levels of humidity or temperature in your incubator. In the same way, you can also vary the number of the egg turns and how often.
Having observed enough periods, you can now segregate data into seasons or according to the adjustments you made like temperature, humidity level, or the number of egg turns. With this data, you can now know the best combinations that will yield you the highest success rate.
Can candling duck eggs damage the eggs?
Candling eggs is a safe, non-intrusive, and simple way of observing the growth and development of the duck embryos. This also allows you to distinguish the infertile eggs from the good ones and have them segregated from the rest to avoid egg explosion.
Just make sure that you use a low-energy light source to avoid altering the ideal temperature of the eggs during the incubation period.
And of course, conduct the egg candling carefully and avoid rough handling of the duck eggs as it may cause the embryo to die.
And as long as you do not drop the eggs, then egg candling is relatively safe to do – even beneficial in many ways.
| Day | Signs | Egg status |
| 5-7 | Visible network of whitish spider-like veins around a small black dot | Fertilized & Living |
| 12-14 | Some movement & body parts | Fertilized & Living |
| 7 | Clear & no veins & no glow | Infertile egg |
| up to 7 | Blood ring, red-like circle & dark streak | Development stopped |
| 14 | Shell is dark and cloudy matter inside | Bad egg |
| 14 | The egg is more yellowish and there are no colors red and orange | Bad egg |
Can you candle duck eggs every day?
There is no problem with candling duck eggs more than twice during the incubation period. Candling doesn’t harm the egg, but there are certain risks that may increase as candling frequency increases.
it is not a good idea to candle duck eggs every day, as candling increases the risk of the eggs being cracked or the embryo inside the shell being damaged due to rough handling or difference in temperature.
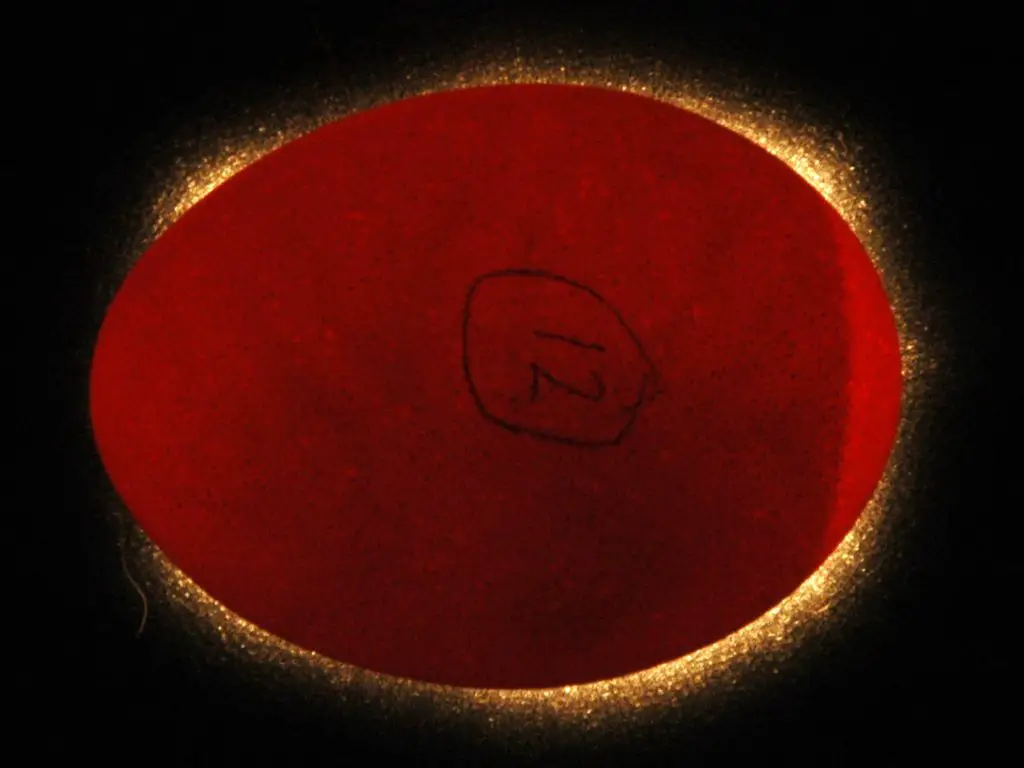
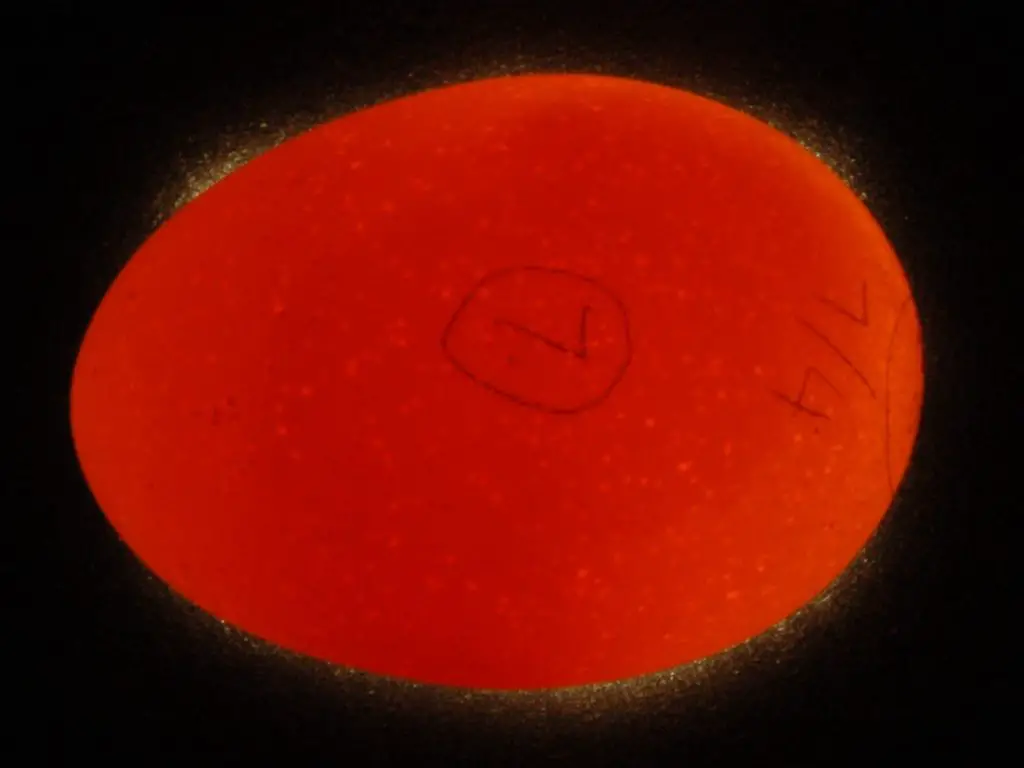
As mentioned, successful egg candling involves the right timing. For ducks and chickens, the ideal time to do the first phase is on Day 7. It may vary between Days 6 and 8. If you can’t assess exactly what’s inside the shell, you may repeat candling the next day.
By day 14, you should expect more development inside the egg.
This is also a good time to see if the embryo has grown to the right size and still spot the veins inside, signifying life. This is also an exciting part of the whole egg candling process since you can even see more defined details in the embryo, like the feet, bill, or a beating heart.
Most poultry operators do not candle eggs anymore beyond Day 14 and until they hatch on Day 28. After all, you might not see as much or observe movements anymore beyond that point because the embryo already occupies the whole space inside.
How to candle duck eggs?
During egg candling, you light up a flashlight through the top and sides of the egg. The light permeates the shell and allows you to observe the inside, including the white, the yolk, and the air sac.
Depending on the stage of the egg, you’ll also be able to see veins and spots, which may indicate embryo death or infertility. You may also see shell cracks from the inside, as well as a whole embryo that has already filled the shell.
- Dim or darken the room.
Setting the background or room as dark as possible allows you to concentrate the light inside the shell and spot the slightest indications of infertility.
- Set the light source through the shell.
You are free to rotate the egg to see as much detail as possible. Early stages may allow you to see the yolk and the white and spot them as shadows. Moving on, you can also see blood veins and the embryo. If you are lucky, you can even observe a beating heart!
- “Winners”
During the first phase of egg candling, the eggs considered the Winners are those that have visible networks of whitish veins around a small black dot, which is the embryo. You may even spot movements.
- “Yolkers”
In the same way, you can also spot Yolkers early on from the Winners. These are infertile eggs that will not develop since their embryos are not fertilized. During the initial phase of egg candling, you can see a clear egg – no veins, no embryo, no movement or glow.
- “Quitters”
These eggs may have developed for a while, but have stopped progressing at some point during the incubation period.
During egg candling, you will spot these Quitters looking like a blood ring, or that red-like circle or a dark streak inside the shell. This is the matter left after the embryo dies and the blood vessels pull away from it.
As the egg deteriorates further, the inside of the shell becomes a dark and cloudy matter, which may move around, too.
- Segregate the bad from the good.
After identifying the eggs per category, make sure to separate the Winners and toss out the Yolkers and Quitters right away before they rot. Place back the Winners in the incubator and observe again after a week. Repeat the steps.
What to look for in healthy duck eggs when candling?
Formerly, a candle was used in checking the eggs, as the name suggests. But now, you can use other light sources like a flashlight. It is important to use low-energy light sources, or those that do not give off as much heat as it may affect embryonic development.
Remember that the incubator is set to the best temperature and altering it may affect egg development.
The method remains the same, but you have to have a good list of signs in mind to understand what they signify as you observe.
During phase 1, spot for the clear signs of Winners as discussed above. This includes a dark dot, which is the embryo, and whitish spider-like blood veins emanating from the dot. These elements can freely move around the bigger air space.
In phase 2, you may not see as much since the embryo is now supposedly bigger and is taking up more space inside the shell. The embryo can hardly move right now.
However, in phase 2, you should also be able to spot a Quitter from a healthy one. The latter should resemble a huge shadow covering most of the space inside the egg with its veins beneath.
Healthy duck eggs during candling may not ensure 100% hatching success.
As you may know, there are two periods that duck eggs undergo before coming out of this world – incubation, and hatching. Egg candling happens during the incubation period and is not the sole determinant of the success of period number 2.
How can you tell upon candling that an egg is bad?
The term “bad eggs” is also another way of describing almost rotten or already rotten eggs. This is the stage wherein the eggs were already infertile from the beginning of the embryo may have died sometime during the incubation period.
During the first 7 days of life, a bad egg looks clear when candled. This means it did not develop an embryo nor the blood veins that were supposed to spring from it.
Early embryonic death can also happen by day 7. This means that an embryo did develop, however, it died right away. During egg candling, you can observe early embryonic death by seeing a thin ring or a cloudy matter inside the egg.
Under healthy conditions, you should spot a thriving embryo in the form of an almost full mass occupying the majority of the shell space with distinct veins springing from it on the 14th day. But instead, a bad egg looks like a black matter resting in the middle with no lifelike movement around it.
Why do duck eggs go bad?
Many factors come into play when it comes to turning the eggs bad before they hatch.
During the first 6 to 8 days of life, duck eggs may go bad because of the temperature of their environment.
You may have exposed the eggs outside the incubator for a long time, or have set the temperature of the incubator itself wrong.
Rough handling during egg candling may also cause the embryo to die in the process.
And of course, there are also reasons that we cannot control like genetics. It is also possible that the eggs have come from aged ducks, which may decrease the fertility rate.
Starting at the 14th day leading to the hatching day, eggs may still go bad and eventually become Quitters.
Factors like incorrect incubation temperature and too much or too little humidity may come into play. And just like with the first week, the problem may show later on when the eggs have come from aged ducks. Exposure to bacteria might be another possible cause.
How to prevent eggs from going bad?
It is important to use the proper equipment, do proper egg handling, and observe the right timing for egg candling.
And aside from that, you must also ensure that the incubator is set to the correct humidity and temperature levels.
Avoid unnecessary egg handling to prevent too many temperature variations on the egg. Remember that you may pass on unnecessary heat when you hold an egg.
Do the right timing for egg candling and leave them inside the incubator apart from the candling schedule.
Tips to increase fertility rate of your duck eggs
Even if you have chosen the most productive breed of ducks when it comes to egg production, there are still many factors that will affect your flock’s annual output.
Female ducks are known to be lousy sitters, thus, they need human intervention to increase the hatchability of the eggs. This is where incubators become an essential investment.
Incubation
During incubation, you can control many factors affecting duck fertility rates like the environmental condition, temperature, and humidity level. You can also prevent predation, or from predators breaking or eating the eggs.
Broodstock Selection
As much as you can, ensure that both the female and male ducks mingling for mating are still at the peak of their maturity age. Also, have full knowledge of other specific factors pertaining to the fertility rate and genetics of the breed you are raising.
Broodstock Nutrition
Other controllable factors on your end also include ensuring the nutrition of the broodstock. Putting them in a thriving environment, feeding them with a proper diet, and lessening their stressors can encourage duck mating and produce high-quality eggs at the same time.
Dipping in Nutrients
Some duck egg hatchers may also consider using nutrient-dense dipping solutions for their eggs.
Final Thoughts
Every poultry operator should know how to candle eggs. This allows you to monitor the growth and development of your embryos. Egg candling is also your gateway to seeing the developing life inside the shell. In the same way, it is a fool-proof and simple way of increasing your success rate in producing high-quality eggs and ducklings.
